Looky what we got this weekend, guys! We finally picked out a light fixture for our upstairs bedroom and we couldn't be happier. We immediately fell in love with the beautiful brass, the angular style, and the gorgeous bevelled glass. Seriously, the moment we saw this guy in
Urban Ore... we just knew, he was the one. What do you think? As enamored as we are?
Haha... Totally kidding! I'm just being a jokester. Of course we purchased this light fixture with a DIY project in mind. As it happens, Nick and I were strolling through Pottery Barn Saturday night and what should catch our (collective) eye, but the new
Blacksmith Taper Lantern.
We loved the open glass-less feel of it, along with the fact that it was hanging from a piece of very rustic-looking rope. The downside(s) to this fixture were that it was only for candles, not electrical, and of course the $99 price tag. So the typical "we-could-totally-make-this-ourselves" conversation ensues.
Hence, Sunday morning we found ourselves at Urban Ore purchasing Mr. Brassy and Classy, for 15 smackaroos. We figured, even if it didn't work like we pictured, we were only out $15. So, on we went to Home Depot to pick up some rope and a can of Rustoleum Hammered Dark Bronze spray paint.
The first thing we did was hang up the fixture by a nail in the
Room of Requirement. Then Nick dragged a garbage can underneath it and began
tapping smashing the glass out of the fixture. The garbage can neatly caught all the pieces of glass, eliminating that dangerous "shards of glass sticking out of my foot" scenario.
I used wadded up paper towel and
frog tape
to protect the sockets from wayward spray painting.
Next, I wiped down the fixture to remove all the dust and dirt and donned my spray-paint version of a
Dexter outfit. I gave the whole fixture + the canopy and wire a quick once over with the spray paint. The paint covered really well, and gave it a textured iron-ish look (which is exactly what we wanted- score!)
While we waited for the paint to dry, Nick removed
chicken-nasty light fixture numero dos to reveal another dark ring of paint.
After testing 6 different "flat white" cans of paint from the extensive paint closet, we finally matched the paint and Nick rolled it on to cover the dark ring.
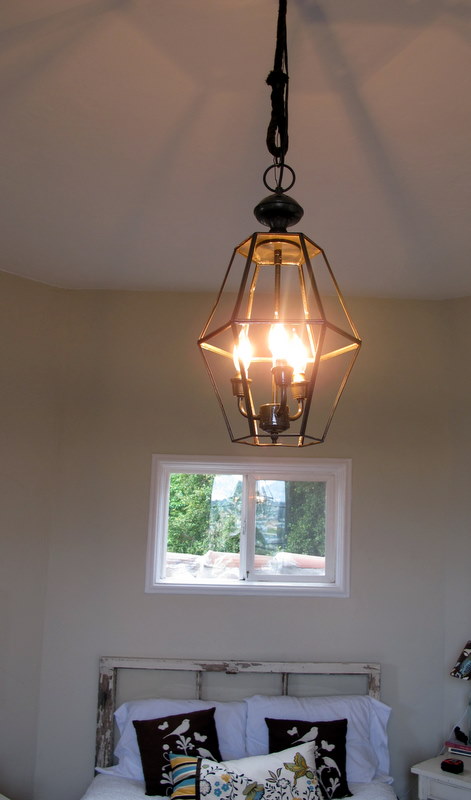
Since spray paint tends to dry rather quickly, we were ready to hang our new fixture only an hour later. And wouldn't you know, while we were in the Room of Requirement, we noticed a coil of old rope from the building's elevator (yes, it uses a rope, but only as an emergency cable to stop the elevator. Scary, right?!). It was way cooler than our store bought rope and destined to be thrown away so we of course decided to use it for our fixture. Plus, it had a lovely natural patina from 70 years of elevator gear oil. It was definitely meant to be since it already had a perfectly sized loop at one end.
Nick fed the loop through one link of the chain and attached it to the lantern portion of the fixture. Then came the actual hanging of the light. Nick threaded the rope through the canopy of the fixture and tied a knot right below it. Once hung, the wire laid flat against the rope, minimizing it's visibility.
We purposefully hung the light a little lower since we wanted to show off more of the rope. Because the fixture hangs above the very end of
the pallet bed, we figured it wouldn't be a natural walkway for people anyway.
Between the light fixture and the spray paint, we spent $19 on this project. (It would have only been $5 more if we had used the rope from Home Depot).
We really like how the hexagonal shape of the fixture mimics the angles of the room. It works really well with the pallet bed,
the refinished dresser, and
farmhouse desk (that is in the process of being stained). The tower room is quickly becoming our favorite in the house and I can't wait to show you the finished product (in good time...).
Here's one last look at what $19 and a couple of hours can getcha:


Love it...I guess I should...I just did the same makeover with my foyer light fixture!!! Hop over and share it at my party.
ReplyDeleteBlessings,
Linda
Thanks so much Linda!
ReplyDeleteLooks great. Awesome job!
ReplyDeleteIt looks great! I love it!
ReplyDeleteYou two are VERY clever! I'm so inspired by this.
ReplyDeleteOMG. That is awesome. I have that exact light fixture hanging in my entry way. I have always hated it. Oh how I wish I could do this.
ReplyDeleteThanks everyone for you kind comments!
ReplyDelete