8.30.2011

it's a jungle in there

Yesterday we had our first day of school so I thought it would be appropriate to share pictures of my classroom. Here's the view when you walk in the door:

Supplies shelves and kitchen area to the right. Notice the home-made flags, repurposed from my brother's party:
My listening and writing centers:

I made curtains for all the built-in shelves to hide everything, out of sight, out of mind...

My line:
The library center that I wrote about before:

There you have it! This is the place where I'll be spending the majority of my next ten months...

8.29.2011

ice cream hats

This weekend we were up in Tahoe, catching the tail-end of a family reunion with my mom's extended family. Since it was birthday season, my parents gave me lots of kitchen-themed gifts (most of which are pink!) on Saturday. One such present was a "ice-cream cookie" pan.
So fun, right?! This gift prompted Saturday night's dessert of... you guessed it, ice cream sandwiches. 
Our inexperience in the area of ice cream sandwich construction led us to create cookies that resembled little bowler hats...or flying saucers...
Nonetheless, they were perfectly delicious.

8.24.2011

a series of fortunate events

When Nick was in elementary school, he wrote a book called a "Fortunately, Unfortunately" Book where each page either started with the words fortunately or unfortunately. I feel this style of writing is very apropos for this story.
I've mentioned that I was camera-less off and on for the last few weeks.
I was making my euro-sham pillow covers and my camera was sitting out on the countertop, in the on position so I could take pictures of the process. Very unfortunately, I accidentally hit the camera, causing it to fall on the ground and die a painful death.
I wish I could blame it on this guy, but the camera death was unfortunately, all me.
Fortunately, Nick, knowing his clumsy wife and her propensity to break/lose expensive electronics had purchased the accidental damage warranty on the camera. We were able to take it to back to Best Buy to see what the Geek Squad could do for us.
Unfortunately, that ended up being absolutely nothing, other than  to send our camera away to be repaired. Fortunately, they told us we could buy a replacement for the interim and they would refund us fully when the other camera came back. So we purchased a Canon Rebel and had fun trying out a DSLR for a couple weeks. Unfortunately, we were getting close to the end of the exchange period for camera number two, so we had to return it. Fortunately, Best Buy called and said, "Unfortunately, there's nothing we can do for your camera, so we will give you the full amount to replace it. "
Fortunately, it happens to be my birthday quite soon and Nick decided to upgrade my original camera with a DSLR for a birthday gift.
Notice my mom's super cute calendar page for August!
After much consultation with camera aficionados, Nick ended up buying me a Canon 60D which is quite an intimidating camera for someone who knows the bare minimum of photography. So, I'm reading my manual and determined to learn how to best use my camera.
The End

8.23.2011

night sky

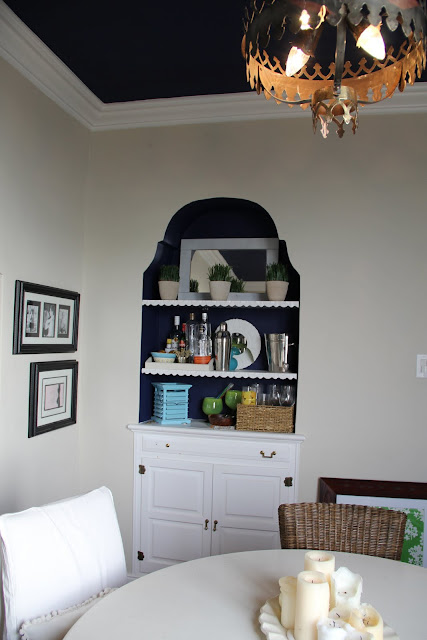
About a week ago, I saw this picture on Pintrest and made the snap decision (I'm full of them lately!) to paint our dining room ceiling dark blue.
I had three quarters of quart left from painting the built-in shelves in the same room (definitely not enough) and decided that I wanted to tackle this project before I went back to school.
Here's a picture of the room with it's  plain white ceiling:
Not bad, but I liked the idea of adding a little more drama to this room. So, I frog taped the crown molding and cut in a few inches with an angled paintbrush. Then I painted 4 coats of blue paint, using a paint roller extension. Even so, my neck was so sore the last few days! Luckily, the whole process was way less messy than I anticipated. As a precaution, I tarped the entire room and moved furniture out, but didn't have any paint-splatter in the hair situation.
So here's the finished project:
We added a white medallion to the light fixture, since we liked that aspect of our original inspiration photo.  The fixture is the original Spanish Revival light that is found in most apartments in our building. Nick loves it. I say, meh....
I love the deep blue with the chunky white moulding. It definitely adds some drama to the room.
Sadly, I think I may have to do one more coat of blue... There are few light spots that you can see only in the middle of the day. My neck is getting it's energy up for one more painting session. 
As you can see, the artwork in this room is in transition again. It will be finished. Someday.  


8.22.2011

Easy Cheesy Lasagna

No camera = no ceiling pictures... So sorry! Instead, I'll share one of my favorite recipes. mmmkay?
One of my favorite meals growing up was lasagna. We didn't have it too often since it can be a labor-intensive process, so it was always a treat to eat.  In college, I perfected my own recipe for lasagna drawing the best from various other recipes. I have to forewarn that this is probably not a healthy recipe, since it contains quite a bit of cheese... But it's oh-so-tasty!

Here's the ingredients list:
Ricotta Cheese*
Parmesan Cheese
Mozzarella Cheese*
Cream Cheese*
1 Egg
Parsley
Spinach
Marinara Sauce
Lasagna Noodles

*You can buy part-skim or low-fat versions of these cheeses and it will taste just fine! 


Here's what you do:
Preheat oven at 350
Chop the 1/2 cup of parsley and 1 cup of spinach.
Mix together half a container of ricotta, 1 cup of shredded mozzarella, 1/2 cup of parmesan, 1/2 a block of cream cheese, and the egg. Add the spinach and parsley mixture.
Now it's time to assemble the layers. I buy no-boil noodles to make the process even easier. I use a small-sized rectangular pyrex dish to cook my lasagna. 
First, put a thin layer of marinara, followed by a layer of noodles. Next, scoop on a layer of cheese mixture. Follow with another thin layer of sauce, and repeat until you've used all your sauce and cheese mixture. I usually try to end at the top with a layer of sauce. Last, I sprinkle mozzarella and parmesan on top and it's ready to cook! Cook for 35 - 45 minutes. 
Typically, I would show you a picture of the finished product, however I personally feel that cooked lasagna doesn't always photograph well, and can look a little eh, unappetizing... so no pics of that!

8.20.2011

take a guess...

.... What do you think I did yesterday afternoon?
I'll give you three hints:
I'm putting the finishing touches on my project today and will have (cross all your fingers) a new camera to document everything tomorrow, but I can't wait to show you! 

8.18.2011

Reading Hut

As I mentioned, I've been spending a lot of time in my classroom the last week to get ready for my little ones' arrival. I decided to do a jungle/wild animals theme for my classroom this year. One thing that I really wanted in the room was a "reading hut/tent" for my library center. My hope is that a reading tent will make the library center more appealing and be a quiet place for a child to enjoy a book.
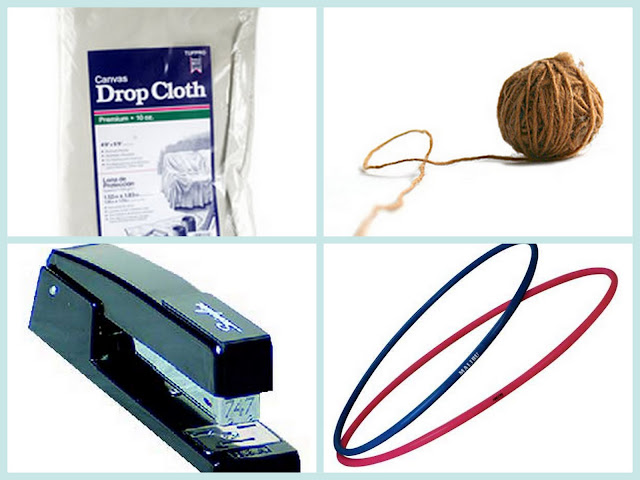
For several days I couldn't quite figure out how to make the hut and then one day I came up with a solution. As with with everything I do, I wanted this to be a cheap option so I wanted to use materials that I already had in my classroom. Here's what I used:
Images found here, here, here, and here.
Because I had the yarn, stapler, and hula hoop on hand, I only purchased the drop cloth ($5 from Home Depot). Unfortunately I didn't take any pictures of the process (mostly because I didn't think it would actually work!) but it was super easy.
1. I used the yarn to make a "web" around the hula hoop.
2. I stapled the drop cloth around the hula hoop.
3. I used another length of yarn to tie the finished product up to a hook on the wall.
4. I draped an extra piece of fabric over the top to create the "tent" top.
As you can see I also added Christmas lights to the inside of the hut. However, these probably will come down since they probably aren't the most fire-hazzard-free option!
I am excited that I was able to accomplish this little corner in my classroom! I know my little readers will be excited for a turn to read in the hut. 

8.17.2011

spur of the moment

Yesterday, I spent the better part of the day unit planning for the upcoming school year. After many hours of sitting at my desk, I felt a little stir crazy and up for a quick project. So I decided to paint our stairs. I've had this thought in my mind for a long time.  Our stairs are painted dark chocolate brown.
As you can see in this picture, the color is nothing exciting and the staircase doesn't particularly stand out. So, I decided to paint the  risers bright white, to match the molding on the wall side of the stairs. 
The first thing I did was tape off the treads and landings, since I wanted to leave those brown. I'm a messy painter, so for me, this is definitely a necessary step. I used my dependable Frog Tape and the prep work took me about 20 minutes.
Then I started at the top and I primed all the steps, so that I could more easily cover all that brown with white paint. I then did 3 coats of white paint on each riser. Each coat only took about 15 minutes, making this a very quick painting project.  An added bonus of this project was that I had all materials on hand so this cost me 2 hours and $0.

Here are some pictures of the finished product. I love how much brighter the stairs are. Since this is a windowless room, it tends to stay dark, especially in the ever-present foggy weather. The white makes everything seem a bit lighter.
You can see in this picture that I made several other changes to the space. I switched the direction of the rug, which made us like the new round table a lot more. We also added our blue bench, so the area feels more "finished" than it did previously. 

A before and after shot:
 (I apologize for the poor photo quality of this post... Sadly, I still don't have my real camera and have had to rely on phone pictures in the interim.)

8.16.2011

pretty lights

In the midst of our cat/classroom induced craziness last weekend, Nick and I took a moment to enjoy the pretty lights of a summer evening. 

8.15.2011

life

Remember this little to-do list I made a couple of weeks ago, when I finished teaching summer school?
So far, we've only accomplished one item on that list... our bedroom. Actually the bedroom isn't even "finished" either. We still have things to do in there, but we got a good jump on it making our headboard and pillows and changing the lighting.
What happened to the rest of the list?? Well, as usual life got busy and DIY projects were put on hold. Currently, these are the things that having been keeping our attention are this guy:

And this place: 
Poor Mr. H. has been very sick since last Thursday. After several long phone conversations with the vet plus two visits, Nick and I spent the weekend nursing him back to health.  (This included feeding him baby food from my fingers... pleasant!)
I'm happy to report that Henry appears to be making a full recovery, which means he's back to hiding in the bathtub, sneakily leaping on Lucy's back, and chatting up a storm! 
That scary place in the second picture is my new classroom, in case you couldn't tell... I was able to start setting things up last week, so that it looks a bit more welcoming come August 29th.

Don't worry, we haven't totally given up on our apartment; we just took a break the last week to focus on more pressing matters. We're hoping to get a few more projects squeezed in before school starts! 

8.12.2011

more pillows

Do I have a pillow addiction? Perhaps. When I was at Pottery Barn a couple weeks ago, I fell for this gorgeous Ikat pillow:
However the price (being $59 for one pillow cover) was prohibitive. Fast forward five minutes to when I am perusing their table linens and what do I spy but Ikat napkins with the same exact print (only smaller)! Are you thinking what I'm thinking?! "Why, Jessica, you could make your own pillows from these napkins!"
And so I did.
I bought 4 napkins, at $6 a pop - 2 pillows cost me less than one of their pre-made pillow covers!
Notice the decorative edge on the napkins. I liked the idea of a square-pleated pillow so I decided to use this nice pleat to my advantage.
So I lined up the edges of two napkins, back-to-back, and used my iron-on hem tape to assemble the pillow.
When I finished 3 sides, I stuffed my pillow inside.
 As luck would have it, I happened to have two extra pillows lying around that were the exact right size for these covers. Then I hemmed the last side using the same ironing method.
What do you think? I think the goldy-blue tones are perfect for the fall.
For now, these pillows are residing in our guest room on our pallet bed.  Like most pillows in our house, they'll probably play musical chairs and end up in other rooms throughout the year. I think that their first move will be to the couch this fall. 


Related Posts Plugin for WordPress, Blogger...
 
site design by designer blogs