11.25.2010

We're Thankful for...

There are so many things we are thankful for this year:
each other

our families


our pets
our home

our sweet baby niece, Hayley

our friends
our jobs, our health, our faith,  our love, and for you, the people that stop by and share our lives each day!
Happy Thanksgiving!
Love,
Jessica and Nick (and Lucy and Henry)


11.24.2010

Easy-Peasy Holiday Gifts: Coasters


Hello Everyone, I've decided to write a "series" of sorts about some easy/inexpensive holiday gifts that you can make this year. These are things that I will actually be making this year, for some of our friends (sorry- cat's out of the bag, guys!)
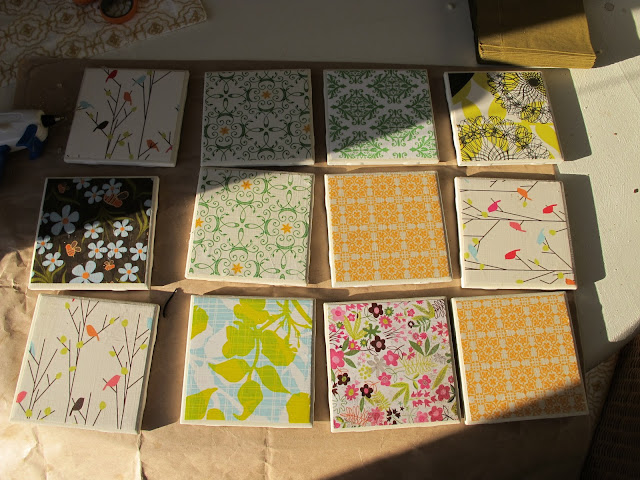
Anyway, first up we have coasters. Everyone can (should) use coasters. I used to not be much of a coaster gal myself, but my hubs is big on coaster-use and trained me into the habit. Unfortunately, I could never find any cute coasters that were cheap, so we had some ugly boring ones for a loooong time. Then one day, I decided to make some coasters for our home and lo-and-behold, I ended up with this:
Cute, no?
Anyway, I digress. This year I want to show a step-by-step guide for making these coasters. You need the following items:

  1. mod podge (I prefer the gloss version that comes with a green label)
  2. craft paper
  3. white 4x4 inch tiles (you can get a similar style at The Depot, like these for cheap-cheap, or if you have a Room of Requirement like us, ask and you shall receive)
  4. felt
  5. a glue gun
  6. a foam brush (a regular paintbrush works fine also)
  7. scissors 
  8. probably a pencil and a ruler (unless you're super awesome at cutting straight lines, freehand)


Okay, now that you've assembled your tools, let the fun begin. First choose the craft papers you want to use. I like to give the coasters in a set of coordinating- yet all different designs (hopefully my friends like receiving them too!), but you can always choose one paper to make a matching set of coasters.

Next, measure and cut your paper of choice into squares to fit on the top of the tile. I like to have a little frame of white showing, so I trim my paper slightly on the small side, but again it's up to you. 
Next, apply a thin layer of mod podge to the top of each tile and affix paper on the tile.

 Smooth out any air pockets with you fingers (no one likes bumpy coasters!)
Wait about 20 minutes for the mod podge to dry. If you try to seal the paper too soon, you'll end up with a very bumpy coaster. Then, apply two or three thin coats of mod podge over the top of the paper. Wait about 20 minutes (or until they are dry to touch) in between each coat.
While waiting for mine to dry, I washed the 10 million cereal bowls and 500 tea cups that had mysteriously piled up in our sink...
I let my tiles dry overnight, this way any air pockets will settle down and they won't be tacky at all for the next step (now, if you chose ugly paper, there's nothing I can do to help you with that, your tiles will remain tacky... I'm just kidding, I mean sticky). However, if you're short on time, a couple hours of drying should suffice.
Now, heat up your glue gun and flip all your tiles over. Since the tiles are rough on the back, you want to add some felt so that the coaster don't scratch up your friends' coffee tables. (I assure you, your gifts will be less well-received if you skip this step!) Cut out squares of felt, large enough to cover the bumpy parts of the tiles. Glue the felt on with your glue gun.

Then.... you're finished! Easy, huh? 
Wrap up your tiles with a cute ribbon, and voila- you have a fun little gift to give to your friends for the holidays (or make for yourself). The next installment of this series will be a little something-something to coordinate with coasters, so keep your mod podge handy! 

11.23.2010

The Power of Paint


This little dresser has been with me since I was born; it's been painted, and repainted, and repainted again over the last 25 years. When Nick and I acquired a new (bigger) dresser for our bedroom, we moved this one to our kitchen nook to store napkins, place mats, table clothes, towels, and other such kitchen-y things. At this point the dresser was just white with plain back knobs- nothing too exciting.
Don't mind my hubby... he's always reaching for another beer : )
It pretty much blended into the room and wasn't doing much except for providing storage. Then, one day last summer, I was painting something for my classroom using a bright turquoise and I had the brilliant idea to paint this little dresser too! (Have you heard about my current turquoise obsession?) Painting took all of 20 minutes and the transformation was amazing. 
I bought 6 yellow knobs from Anthropologie. (They seriously have the best knobs ever!)
I found these 2 drawer pulls online for $3.50 total. I used some extra craft paper and wrote "napkins" on one and "towels" on the other. What can I say? I love organization. (and now Nick can't feign ignorance about where things go anymore!)
So that's our little dresser makeover. I love how a little paint and some new knobs can totally update a piece of furniture!


Domestically Speaking

Bedroom Inspiration

 There's a reason we haven't really shown any pictures of the bedroom in our home... It's definitely a work-in-progress. Its about 85% complete and I think it just needs some small finishing touches to pull it together. Here is an inspiration board to show you what I'm thinking, in terms of finalizing the room. 
  1.  I LOVE this duvet cover from West Elm. Pottery Barn carried a similar one a couple years ago, but this one is about half the price and its organic! I would really love it in sea spray, which is a light blue. (Are you listening, lovey??) Since Nick insists on sleeping with the windows open year-round, I've decided an extra duvet, that can be folded at the end of our bed, is necessary for my warmth and sanity. 
  2. I found this picture on House of Turquoise and I love the idea of 3 big pillows lining the headboard, instead of 2 shams. My mom is teaching me how to sew and I think my first project may be some pillows for the bed!
  3. This picture is also from West Elm. I really like the asymmetrical grouping of white frames above the bed. We have many white IKEA frames that I could use to do this and I'm thinking of some black-and-whites to fill them, to keep things more neutral and serene. 
  4. This picture is from yours truly. I created this grouping of frames on the back wall of our office nook. I think that I'd like to do it again but with a little less color. 
Now here's a compilation of what we currently have in our room:
  1. This is a picture of our wall color. We used to have white walls like the rest of our home, but I convinced my hubby to paint them last spring. We love the warmth that this light brown paint brings to the room. It makes it feel nice and cozy. (As you can see, our plaster walls are VERY textured).
  2. These are the colors we really like for the bedroom and they have been popping up in different spots (a painting, our duvet, vases, etc.)
  3. This is the stain color that we used on some of our furniture in the bedroom.
  4. The rest of the furniture is painted with this off-white. I really like mixing and matching pieces and finishes, rather than having an entire matchy-matchy furniture set. 
  5. This is placemat from Pottery Barn. I unstitched the side, filled it with stuffing and restitched it to create a rectangular pillow. I really love the blues and greens in the pattern. 
  6. I found this material at my favorite material store Piedmont Fabric. (Seriously, if I could own a material store it would look just like this one!) The fabric is an organza with little cut-out pieces sewn in lines down it. I used this fabric to cover the plain white lampshades in our room. 
  7. This is our duvet cover, which was a wedding gift, also from Pottery Barn. It has a simple green dot pattern in two rows around the border. I like it and I think it would definitely complement the new duvet I will be getting for Christmas (just kidding!) One can never have enough duvets...
  8. This is the color of our baseboards and crown molding. We were lucky to have some nice chunky crown molding already installed all around our apartment (Another period aspect that I love about our place!) 
So there you have it- a plan (of sorts) for finally finishing our bedroom! I'll keep you updated on the progress...

11.22.2010

Gobble Gobble

I spy with my little eye....

On our morning outing to the dog park today, Lucy and I spotted three feathered friends. These guys were just chilling inside the dog park. They were totally relaxed and the dogs left them alone. Personally, I think that with Thanksgiving so close, they were trying to escape the prospect of being anyone's Thanksgiving dinner.

Lucy was quite interested and we sat at the fence for a few minutes, watching them prance around the hill.
We've actually spotted these guys before, crossing the busy street, walking around the rose garden by our home, and walking down the sidewalk... I'm not really sure where they live, since we live in a fairly urban environment.
This turkey-siting surely livened up our morning walk and put me in the Thanksgiving mood. I just hope our neighborhood turkeys avoid becoming anyone's Thanksgiving Dinner this year! Three more days, guys!!


{PS: I apologize for the poor cell-phone quality pictures, as I did not have my camera with me.}

We did it!


Last weekend, Nick and I purchased a seen-better-days, sliding door cabinet from Urban Ore, with the intention of turning it into a console table for our entry hall. We certainly had our work cut out for us. We measured our space beforehand and knew that we had 40 inches, in which to fit our cabinet. Of course the one that we ended up loving was unfortunately 43 inches. Never mind that! We decided we could cut the cabinet down to size.
So, we took over to Nick's parents' house, where my very talented father-in-law, Bob and Nick set to work making the cabinet fit into our space...
First, they took the doors off,
then took out the nails holding the sides together,
measured (and measured again) and then sawed off 6 inches,
used a rubber mallet to knock off the side, 
 pried off the excess top and bottom pieces, to preserve the side,
 routed out the side for the shelf to fit in and the side to fit back into the top and bottom of the cabinet,


 and put the whole thing back together, and then sanded it to get rid of some the scratches and make it easier to take paint.
 Nick then  then primed and painted the whole cabinet for me using Behr Premium Plus Painter and Primer in One. We chose a glossy bright white for the exterior cabinet. Nick also added some legs that we got from Home Depot:
{photo via homedepot.com}
What did I do during all this? Sadly, I didn't have a big part in the rebuilding process, other than handing tools, making the decisions, and taking pictures of the process. However, as soon as we got the cabinet back home, it was my turn to finish up the project. I added a final coat of white paint to the whole cabinet to give it a clean glossy look and then set to work on jazzing up the cabinet doors. First I primed the cabinet doors. 

Rust-oleum Corp/zinsser 249089 "Painter's Touch" 2x Ultra Cover Spray Paint 12oz. - Winter Gray (Pack of 6)
Then I spray painted the doors with Rustoleum's  Winter Gray.
When everything was painted gray, I used Frog Tape to tape off the panels. I really like Frog Tape because it it really seals and there's minimal bleeding of paint. It makes for clean lines.  Prep work is never fun, but it makes the end result look much more polished and clean. The moral of this lesson? It's important to spend time taping to get the look you want. 
Frog Tape 82011 Pro Painters Masking Tape, Green 1-Inch by 60-Yards

 I took a little color leap-of-faith and painted a yellow stripe around the interior of the door panels. I've really been liking the yellow and gray combo that's been cropping up lately. I painted the "panes" with the same glossy white paint of the rest of the cabinet.
 
Lastly, I used a stencil that I picked up from Michaels for a couple of dollars. (On a side note, here's the 9,000th reason I love my husband. Last Saturday evening, I decided on the spur of the moment that I wanted to use a stencil for the interior of the doors. Nick, sweetly turned off the TV and drove me over to Michael's right away AND thoughtfully helped me choose the right stencil.) 
(A tip for stenciling: to keep the stencil from running or looking too thick, wipe it off between two paper towels after each stencil. It keeps things looking neat and tidy!)
Although painting the doors took the better part of my weekend, I'm really happy with how they turned out! (Plus, I painted on a sheet on our living room floor, so I was able to catch up on my DVRed Nate Shows from last week!) 
Our last step was to put the sliding doors back on the cabinet. Here's where we ran into a few problems... 


If you look in the upper left hand corner, you can see that the corner doesn't fit together all the way anymore... The little gap is fairly noticeable so we might put a thin piece of the molding around the front of the cabinet so that the gap doesn't show.
I have a little touch up painting to do, but for all intensive purposes, we're done! I think our new console makes the whole entry hall brighter and I love the extra (concealed) storage it will provide for us!

So, what do you think?? We'll leave you with one last before-and-after....
Related Posts Plugin for WordPress, Blogger...
 
site design by designer blogs